Monday, April 12, 2010

A Slice of the Pie


I'm a traditionalist, especially around the holidays. So this year, since we were not going back to New Jersey for Easter, there was no question that I'd make my mother's Pizza Rustica, a savory pie made with sausage, eggs, and lots of cheese.


Traditionally eaten for Easter breakfast, Pizza Rustica is packed with hearty, filling goodness which oozes out of each slice. Growing up, we used to anxiously wait for Easter morning to have a slice of the pie, and though I do love traditions, this year, we just couldn't wait.

Luckily, we were invited to a friend's house for an Easter Vigil party, so I was able to bring a small pie which we all devoured at around midnight. Well, I guess it was technically Easter morning.


Anyway, there's no need to wait until next Easter to make this delicious treat. I have a feeling I'll be making it again very soon.


Pizza Rustica
Makes two 9" pies or one 16" pie

For the crust:

1 stick of butter ( melted and cooled to room temp)
1 egg
3/4 teaspoon of salt
1/2 teaspoon baking powder
3 cups of flour
1/2 cup of ice water


1) In a large bowl beat together the egg, cooled butter, and salt
2) slowly add the flour and baking powder. Mix well. The dough will be very dry and crumbly.
3) slowly add 1/2 of the ice water and mix. Add the rest as needed. The dough should feel moist and slightly greasy.
4) cover in plastic wrap and set aside for at least 30 minutes.


For the filling:
4 hard boiled eggs, sliced
3 lbs of Italian sausage, crumbled and cooked through.
1 lb of farmer's cheese or mozzarella cheese ( grated)
1/2 cup pecorino romano cheese ( grated)
1 egg beaten


Assembling the pie:

1) on a floured surface roll 1/4 of the dough ( if making two pies, 1/2 of the dough if making one large pie) to 1/16" thickness. Lay over a greased cake pan, making sure the edges hang over about 1/2".
2) Fill the pie crust with layers of sausage, hard boiled egg, farmer's cheese, and pecorino cheese. When the pie is full, beat one egg and pour almost all of it on top of the filling. This will bind the pie. Save just a small amount to brush over the top of the crust.
3) Roll 1/4 of the dough to 1/16" thickness and place over the pie, making sure that the edges hang over about 1/2 ".
4). Fold the sides over to create a lip and pinch the dough between your thumb and pointer finger to close the sides. ( see picture above)
5) Cut slits into the pie crust to allow air to exit during baking.
6) Brush the top with the beaten egg to give the pie a nice golden crust.
7) Place in a 375 degree oven in the center rack and bake until golden, ( about 35-50 minutes)
8) Serve hot and enjoy
-- the pizza rustica can be frozen for up to a month. Defrost it at room temp and then heat in a 375 degree oven until hot.

Saturday, April 10, 2010

Cipolliness

Hello everyone!
I've been in Denver for the AWP conference and have had a terrific time talking to writers, agents, publishers and fellow bloggers.
I've been so happy that I decided to create Cipolliness - a blog featuring the little things that make me happy each day.

Thank you for being patient with me- I'll be back to cooking tomorrow, I promise!

Sunday, March 21, 2010

Pici -"Oh Wow"


First of all, let me apologize for neglecting my blog, all of my blog friends, and all of your sweet comments. I've been spread so thin lately that I can barely manage to cook, and when I do, it's noting worthy of posting. But I do really appreciate all your support, and even when I don't respond to a comment, please know that each and every one brings a smile to my face.

As I just mentioned, I've been busy, really busy. March has been totally crazy and I've been living my own personal "March Madness" between work, my internship and editing my book. But I have a goal for myself: I'll start sending my book out to agents ( know any good ones?) by April 1st- and so far, I seem to be on track, even if it means waking up at 5 am to revise for a few hours before going to work.

But enough about that, let's get to the food. You're probably wondering about the title of this post, like- what are Pici? and why do they get an "oh wow"?

Pici are a hand rolled Tuscan pasta, similar to a really really thick spaghetti, made with semolina flour and lots of love. The "Oh wow" part comes right from Gian Luca's mouth, as I opened the fridge this evening and took out my day's work for him to see.

He's been talking about Pici for months now and we never had the time to buckle down and make them. But this afternoon, when I opened up the freezer and saw the lonely pint of Ragu just hanging out, I decided today was the day. There it was, the perfect reason to procrastinate staring me right in the face.

And, since Janelle of Talk of Tomatoes proposed a pact that we start making our own pasta, I really had no excuses did I? So girl, I'm tagging you now- you're it! ( Anyone else want to join us?)

So if you need to procrastinate, or you're just in the mood for some delicious pasta, give these a try. I promise you'll be saying "Oh wow" too.


Pici
( Makes 4 servings)

1 cup all purpose flour
1 1/4 cup semolina flour ( plus more for dusting)
3/4 cup tepid water


1) On a clean work surface, make a well with the two flours
2) Slowly add the water to the middle of the well, incorporating flour from the center of the well until a wet dough forms. Knead in the rest of the dough, adding more water if the dough is too dry. Knead together to form a ball.
3) Place the dough ball aside and clean your work surface. Scrape up and discard any dried dough bits.
4) lightly flour your work surface again and knead the dough ball for a good 10 minutes using the palms of your hands ( think of it as a workout). The dough should be elastic and slightly sticky.
5) Wrap dough in a plastic bag and let it rest for 30 minutes.
6) Remove dough from plastic bag and pinch off one inch of dough. Begin by rolling the dough into a log in the palm of your hands, then place the log on your work surface and roll outwards, pressing gently with your palms. Roll the dough out until it is a long, thin strand, about 1/16th of an inch thick. This will take some practice, so don't worry if all of your pici come out to be different sizes.
7) Lightly dust a cookie sheet with flour and place the finished pici on that, careful not to let them stick together. Repeat with the rest of the dough. ( Refrigerate the pici if you won't be using them for a few hours. For anything more than 1 day, pop them in the freezer.
8) Bring 8 cups of water to boil. Add 2 tablespoons of salt and one teaspoon of olive oil to the boiling water. This will flavor the pici and allow them not to stick together. Add the pici and cook until cooked through, ( about 5- 10 minutes depending on the thickness of your pasta).
9) Drain and serve with ragu and pecorino cheese.
10) say "Oh wow" just to make me feel good :)

Saturday, March 6, 2010

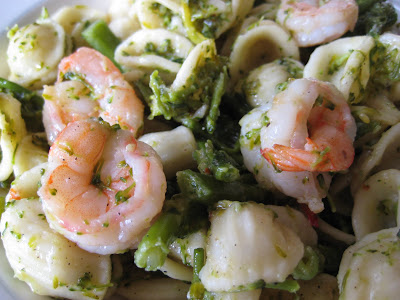
Orecchiette with Shrimp and Broccoli di Rape


Lately I've been thinking a lot about my aunts, uncles and cousins in Italy. Its been almost three years since I've been there to see them, and even though we can connect through Facebook and Skype, there is nothing like being there in person to sit around a big lunch table, talk, laugh and eat loads of homemade food.
Obviously I love going back to see them, but I also love going back to eat, and my aunts all know exactly what I crave and find a way to make my favorite dishes. My Zia Anna always makes her Crostata di Ricotta, with her homemade ricotta cheese that is like no other I've ever tasted. Zia Guiseppina make her panzarotti, which, when we were kids, we'd fight over. Zia Lena makes spectacular pastas with the wild mushrooms that my Zio Vincenzo collects on his morning walks through the woods, and finally, Zia Maria, my Godmother, makes her Orecchiette.

Zia Maria is a specialized pasta maker. I've seen her work and she's methodical but has that certain rhythm that can only be seen when one is really enjoying her work. She sets out her wooden board, coated with years of flour, on the counter near her window. There she works, always taking time to chatter with neighbors as they pass, watch her grandchildren play in the street outside, and wave her husband in from the cold. She does this almost every day, and it is comforting to think that even now as I write this post, she is probably at her window, rolling out dough and shaping the "little ears" with her thumb.
I rarely make my own pasta. I love doing it, but most days there is not enough time, so we have to be content with dried pasta from the grocery store. Luckily, with the right sauce, the pasta still has the ability to transport me to the streets of Salandra, where I am walking outside of my Aunt's window, waving to her as she works.


Orecchiette with Shrimp and Broccoli di Rape
Serves 4
3/4 pound of orecchiette
1 pound of Broccoli di Rape
1 pound shrimp ( peeled and cleaned)
4 tablespoons extra virgin olive oil
2 large garlic cloves
1/2 cup dry white wine
1/2 teaspoon lemon zest
1/4 teaspoon red pepper flakes
salt and pepper to taste

1. Bring 3 quarts of salted water to boil. Add Orecchiette and cook according to package directions.
2. Cut Broccoli di Rape into small pieces and blanch in boiling salted water for 5 minutes ( this will remove all the bitterness)
3. In a medium saucepan, heat the olive oil. Add the garlic cloves and red pepper flakes. When the garlic beings to brown, add the shrimp and cook until they turn pink. Add the white wine and simmer for 3 minutes. Add the blanched broccoli di rape, salt and pepper to taste. Allow to simmer together for another 3 minutes.
4. Drain the pasta and add to the saucepan. Stir to coat the pasta in the sauce. Top with the lemon zest. Serve hot.

Wednesday, February 17, 2010

Souffle for Two


I'm terrible at Math. I've never liked the subject and, in school took the minimal amount of Math possible to graduate. That means I only took three years in high school and one measly semester in college, and let me tell you, they were both a long time ago.

Yet, math seems to always rear its ugly head my way. Like when I was a Senior in college and had to take the GRE for grad school, or when I'm trying to convert recipes from the metric system to our measurements. Luckily, I married an engineer who loves math, so Gian Luca usually takes care of all of the mathematical requirements in the house.

But yesterday, in honor of Mardi Gras, I wanted to surprise him with chocolate souffles. Now, I know that sounds daunting, but I am a self proclaimed souffle queen, and nothing about the process is scary to me. That is, until I realized that unless I wanted to make 24 souffles, I'd need to do a little math.

See, a normal batch for me would be 24 souffles, because I am used to making restaurant quantities of these guys. I don't even have the recipe written down, because, for six summers of my life, I'd unlock the door to my brother's restaurant at 9 am, turn on the lights to the empty kitchen, hook up my Ipod to listen to some U2 and whip up a batch before hitting the beach. In less than an hour, I could make 24 souffles and be out the door before the prime hours of sun hit. And, I did this seven days a week. So I never even had to think of writing down the recipe until yesterday.

First of all, we don't even own 24 souffle cups, so of course, making a whole batch was not an option. But I vaguely remembered that the original recipe started out as one for 8 souffles. Still too many for us, but at least that would be manageable.

I scoured the apartment for a calculator but was not able to find one, so I figured I could divide on my own. If a 6th grader could do this math, so could I. I grabbed my pen and paper, writing down the recipe for 24, them dividing it by 3, then finally dividing that by 4 to get the lonely two souffles which we would enjoy.


I was skeptical- what recipe calls for 1/2 a tablespoon of butter? And how in the world would I fluff up one egg white?

I pulled on an apron and turned on some U2 for good luck.

Low and behold, the batter looked and smelled fine ( and the lonely egg white did whip up just fine). And when we baked them hours later, they rose in all their splendor, just like a normal souffle at my brother's restaurant. And, given the mathematics that I went through to make them, they tasted even better.

Chocolate Souffle
This recipe yeilds two souffles. It can easily be multiplied to make any amount necessary.

2 ounces of semi-sweet chocolate
1/2 ounce of unsweetened chocolate
1/2 tablespoon of butter ( plus more for coating the souffle cups)
1/2 tablespoon of flour
1/4 cup milk
1 tablespoon sugar ( plus more for coating the souffle cups)
1 egg ( separated)
1 teaspoon powdered sugar


1. Coat the inside of two souffle cups with butter, making sure to get the sides and the top rim. Roll sugar in the cups, making sure to coat the entire inside, sides, and top rim. This will allow the souffle to rise.

2. Chop the chocolate into small pieces to make melting easier.

3. In a small saucepot, melt butter over a low flame. Add the flour and stir until it forms a paste. Add the milk and stir to form a roux. ( Make sure that all the flour/butter mixture has melted into the milk. If needed add a tablespoon more milk.) Stir until thick.

4. Add the sugar and chocolate and stir until the chocolate melts. Remove from flame. Transfer the chocolate mixture into a bowl and allow to cool slightly.

5. Add the egg yolk to the chocolate mixture and stir well.

6. In a separate bowl, whisk the egg white until it forms a soft peak. Add the powdered sugar and continue mixing until it forms thick peaks.

7. Slowly fold the egg white into the chocolate mixture, being careful not to deflate the white.

8. Pour batter into prepared ramekins. At this point the souffles can be refrigerated until ready to bake. They are best baked the day they are made, but will keep in the fridge for up to three days.

9. To bake the souffles- preheat oven to 400 degrees F. Place the souffle dishes on a baking sheet ( this makes removing them so much easier). Bake on the middle rack for 25-30 minutes.

10. Top with powdered sugar and serve with vanilla ice cream and strawberries. Enjoy!

Sunday, February 14, 2010

A Valentine


Happy Valentine's Day!
Gian Luca and I have been celebrating all week ( which may explain why I have not posted)!
Our celebrating started early in the week when we got a big surprise that has kept smiles on our faces this whole week ( sorry, I won't say what it is just yet).
Then, on Wednesday, when I came home from work, I found a huge package from my parents on our doorstep. My brother Joe is an actor and a member of SAG so I knew my parents were sending me a bunch of movies that he gets to review ( and we all get to watch) but I had no idea what could have possibly made up the other ten pounds in the box. My first thought, cookies.
My mom loves to bake even more than I do and it seemed logical that she'd send some our way.

Link
Well there were some Biscotti di Prato inside the box, but she didn't stop there. She sent a humongous jar of Nutella, perfect for making these, a box of Ferrero Rocher candies ( Gian Luca's favorite), some amazing scallion and black olive stuffed focaccia ( I promise I'll get the recipe soon), and all the fixing for my favorite soup- Stracciatella.

That's right, my mom sent me frozen blanched escarole and frozen mini-meatballs so that I could combine them with chicken stock and an a few eggs and enjoy a little taste of home.
It was by far the best care package I've ever gotten. How is it that moms just know?


Stracciatella is also know as Italian Wedding Soup, though, growing up we never referred to it as anything but Stracciatella ( which, by the way, is also the name of a very popular gelato flavor).

Stracciatella Soup
There is no recipe for this soup, just a few instructions and links to other posts. Enjoy.

For Chicken Stock click here
For the meatballs click here just be sure to roll the meat into tiny tiny balls ( about 1/4 inch round). They cook up faster than the larger ones so keep your eye on them.

For the soup:
2 quarts of chicken stock
2 cups mini-meatballs
1 head of Escarole- chopped and blanched.
2 large eggs- beaten

In a large stock pot, heat chicken stock, 2 cups mini-meatballs and escarole. Bring to boil.
Add beaten eggs into the soup and stir. Let simmer for an additional 3 minutes. Top with freshly grated cheese and enjoy with crusty bread!

Friday, February 5, 2010

Cream Puffs


Sunday is our friend Giacomo's birthday and since we are seeing him tonight, I wanted to make something special. Cream puffs came to mind because when we were little kids, my mom always always always made cream puffs for a special occasion. And since Giacomo is from Italy, I figured he'd appreciate the Italian creme in these. And I figured you would too.


See, these are not your average creme puffs, filled with thick whipped cream, or butter cream, these are Italian creme puffs, filled with crema pasticchiera- doesn't that just sound special?
Well, it is, and it is also easy to make, which is great on a day that I am working from home and have a to-do list as long as the table.

Cream puffs have two steps- hence the name "cream" and "puff". Incidentally, both parts can be used in many many ways. Like Italian rum cake? Try it with this cream. And the "Puff" is so versatile. It can be used as the base of my favorite dessert- profiteroles ( just fill these suckers with ice cream and top with a hot chocolate sauce), or, since they are not sweet, they can be used in savory dishes. You can stuff them with crab salad or goat cheese and sun-dried tomatoes- yum!
So next time you want to make something special for someone ( ahem- like on Valentine's day perhaps?) give these a try.


Cream Puffs
yield 20 medium creampuffs

The Puffs-
1 stick of butter
1 cup of water
1 cup of flour
4 eggs- at room temp.

1- In a medium saucepan on low heat, melt the butter.
2- Add the water and bring it up to a boil.
3. Once the butter/water is boiling, add the flour and stir, making sure to "cook" all of the flour so that no white is showing. ( You'll be able to hear the sizzling of butter on the sides of the pan- this is a good thing!)
4. Remove the dough from the stovetop and spread it on a flat plate to cool- like this:


5. Once the dough is cool, transfer the dough to a mixing bowl. Beat in eggs one at a time on a low speed. The dough will appear sticky. This is good! Preheat oven to 400 degrees F.
6. Lightly grease a baking sheet. Drop teaspoons of dough on the sheet, about 1 inch apart.
7. Bake on the middle rack at 400 degrees for 15 minutes. DO NOT OPEN THE OVEN!
8. Lower the oven to 350 degrees F and bake for an additional 20-30 minutes, until golden. ( If you have to peek you may at this point)
9. Cool on a wire rack.

Crema Pasticchiera
2 cups whole milk
the peels of 2 lemons
3 egg yolks
4 heaping tablespoons of powdered sugar
4 heaping tablespoons of flour

1. Peel the Lemons, leaving them intact. Place the lemon peels in two cups of whole milk. Heat the milk on the stovetop, over a low flame, being careful not to let it boil.
2. In a different bowl, whisk together the egg yolks and sugar. Once incorporated, add the flour.
3. Add a small ladle full of the warm milk into the egg mixture, whisking quickly so that the eggs yolks do not cook.
4. Add the egg mixture into the milk and stir over a low flame until it thickens into a cream- about ten minutes.
5. Remove from stovetop and allow to cool to room temp. Remove the lemon peel.
6. Refrigerate until ready to use.

Assembling the cream puffs:
Cut each puff in half. If you'd like them topped with chocolate, like I did melt some chocolate chips in a double boiler, being careful not to burn them. Add a bit of butter ( about 1 teaspoon per cup of chips) to give the chocolate a nice shine. Stir it together. Dip the top of the puffs in the chocolate now. ( it is a lot easier than dipping when the puffs are filled).
Spoon the cream into the bottom half of the puff, and top with the top. Sprinkle with powdered sugar or let them be.
Refrigerate until ready to serve.